Category Archives: Child’s Play

DIY Fireman Costume

Did you hear somebody yell, ‘Fire’ ?

DIY Fireman Costume 4

No worries. With the help of a little duct tape, an old t shirt, and a couple of iron on’s … an adorable little helper is on the way.

DIY Fireman Costume 3

Do your kids’ have Career Day at school? The sons’ elementary school hosts one every year, and you can literally be anything you want when you grow up. Well, besides a Ghost ‘Butter’, much to our honey nugget’s initial disappointment. The school does require they be legitimate ‘carrier’ choices, and since I haven’t heard that the cast of Ghost Adventures is looking to hand over the reigns anytime soon (or in the future), we went with the youngest son’s second choice.

DIY Fire man Costume 5

If he can’t be a hunter of wayward souls, he’s perfectly content spending his adult hood ‘saving people’. He couldn’t have pickled a nobler profession.

Whether it’s for Career Day, Halloween, or just creative play where we encourage them to ditch the batteries for a few and stretch their imaginations, this DIY costume is too easy not to make. The whole get up cost me less than $10 (it could be significantly less depending on what supplies you have on hand, too).

Directions

DIY Fireman Costume

yellow duct tape
smaller silver duct tape
American Flag iron on patch
iron-on letters that spell FIRE DEPT
over-sized, black long-sleeved t-shirt
fireman hat
black or yellow galoshes, optional

DIY Fireman Costume 2

1. We used a hand me down black t that had a graphic design on it and just turned it inside out. Take the standard size yellow duct tape and wrap it in a complete circle about 1/2 inch above the bottom of the t shirt. Do another under the armpits at ‘chest’ level. Then do two more yellow circles on the sleeves, one towards the bottom and one up towards the shoulder. Go over each yellow circle with a strip of the smaller silver tape creating another band right down the middle.
2. Have a heated iron ready. Follow the directions on the patches. Iron the flag patch above the upper band on the right sleeve of the outfit. Iron the letters for ‘Fire Dept’ above the top/chest band on the back of the outfit.
3. Complete your child’s fireman costume by wearing the shirt with black pants, a fireman hat, and rain galoshes for ‘boots’.

DIY Indiana Jones Costume

When the kids were little we bought their costumes for Halloween. I couldn’t bring myself to break the bank so we’d shop at the local Kids’ consignment shops and even Goodwill, and they always looked adorable, and they were always quite content but something about our ‘process’ was missing for me. Then when the youngest son was 3, I decided he was going as The Doctor for Halloween. The 10th regeneration, my favorite: David Tennant’s Doctor. And seeing as how I wasn’t made of money to custom order every costume component from Think Geek, the only option was to do it ourselves. And we all had a blast! The whole family got in on it.

DIY Indiana Jones Costume 3

And we’ve never looked back since. Each year we start brainstorming about a month ahead of time and then we get to work assembling everybody’s costume of choice. We’ve done a stickman, Uncle Si, God’s gift to women, Steve from Minecraft, Superman/Clark Kent, The Hulk, Kristoff from Frozen, and The Scarecrow from Batman just to name a few. One of my favorites, and easiest to throw together was Indiana Jones.

‘Hey, Lady. You call him Dr. Jones!’

DIY Indiana Jones Costume

We found khaki pants on clearance at Walmart, but they’d be easy to find at Goodwill or a consignment shop as well. For us, they doubled as church pants, post-Halloween. We found a brown fedora in the costume section. We did hit up Goodwill for the white button up, and found the awesome aviator jacket there as well (for $5!!). That’s also where we found his ‘messenger bag’. He wore a pair of brown hiking style boots and brown belt he already owned. We hot glued a twine ‘whip’ to one of his belt loops, and we completed the look with a big ass grin and some rosy red cheeks.

DIY Indiana Jones Costume 2

Wherever he went, everyone knew who he was! Which he thought was pretty much the greatest thing ever. And the whole thing cost me maybe $15 with everything being reusable and needed outside of Halloween. That’s what I’d call making it big, or as Dr. Jones so aptly put it …

‘Fortune and glory, kid. Fortune and glory.’

Despicable Me ‘Minion’ Pumpkin Tutorial

The sons have always enjoyed the Despicable Me movies, and the Minions’ antics have kept them in stitches throughout all three films. The boys even made me download the game ‘Minion Rush’ onto my tablet so they can play it whenever the mood strikes. (Just don’t tell, since the older ones might get a tad embarrassed to have their secret outed, you know since they’re supposed to be to old for cartoons and all) They have a legit talking Dave and the teenagers still can’t help but pick up and play with the fart gun (remember our families four tenets? No judging please).

Minion Pumpkin 1

So when my little bit asked me to help him make a Minion ‘punkin’ for Halloween, I couldn’t say no. Never even crossed my mind. But after I’d automatically said yes, I had that ‘oh shit’ moment all Moms occasionally have at the thought of a commitment they’ve made where they’ve bitten off more than they know they can chew. I can fake it til I make it most of the time but, even on my best day, my pumpkin carving skills aren’t anywhere near up the the standard of precision required for any of the stencils and templates I googled.

But even on my worst day, I can paint. So we kicked all thought of carving to the curb, and painted ourselves a pumpkin shaped Minion. And he was adorable. But nowhere near as adorable as the youngest son’s face when he first saw our finished pumpkin.

DIY Minion Pumpkin

minion pumpkin tutorial

Pumpkin (real or fake)
Canning jar lids
Long nails
Wooden skewer, optional
Hot glue gun and glue stick
Yellow spray paint
Blue spray paint
black and brown paint, or Sharpie markers
Black pipe cleaners

Directions

  1. Paint the top half of the pumpkin with yellow paint and let dry. It’s ok if it takes more than one coat to get the desired effect. On the pumpkin pictured we used acrylic paint and did multiple coats.
    2. Paint the bottom of the pumpkin with blue paint and then allow it to dry completely. Once dry, add a second coat if desired.
  2. Minion Pumpkin 4
    3. Take a canning jar lid and pierce a hole in the center with the tip of the nail. Tap gently with a hammer if need be, to pierce.
    5. Flip the lid so that the white part is showing and insert the nail through the hole in the center, and apply a bit of hot glue to secure the head of the nail to the lid.
    6. Apply a ring of hot glue all around the inside of the silver ring and press the flipped lid firmly to it, hold for a second to seal and then set aside to completely dry.
    7. Use a skewer, or an extra nail, to pierce a hole where you would like the center of the canning lid ‘eye’ to be, keeping in mind that the eyes form the center of the face.
  3. Minion Pumpkin 3
    8. Gently push the nailed lid into the hole, being careful not to push any of the attached bits apart.
  4. 9. Paint the black straps of the goggles on both sides of the eyes.
    10. With paint or Sharpies, color in the details of the eyes (the screw will be camouflaged by the paint).
  5. Minion Pumpkin 1
    11. For the hair, use the skewer, or extra nail, to pierce holes at the top of the head and insert the pipe cleaners into the holes.
    12. Finish your pumpkin off by drawing on a mouth.

Sous Chef Sunday: Monster Tongues (Marshmallow Pinwheels)

These may look gross, especially when you consider they’re called ‘tongues’, but they taste great and the kids (especially little boys- hey snails and puppy dog tails, right?) get a huge kick out of them. They’re perfect for a spooky Halloween treat, or even as a crafty snack to accompany one of our boys favorite children’s stories, I Need My Monster. Also, a great read when you’re gearing up for Halloween with its perfect mixture of scare and flair.

Monster Tongues

But, back to our tongue in cheek treat, perfect for any little monsters you may know. I haven’t met a kid yet who didn’t love these fun treats, even the ones who squealed with equal parts disgust and delight.

And they’re e a s y, a mixture of marshmallows melted and stirred into flavored gelatin, and then is chilled in a pan before being rolled up and sliced into wiggly, giggly little pinwheels, err tongues.

Monster Tongues (Marshmallow Pinwheels)

Monster Tongues 2

1, 3 oz, package flavored jello gelatin (NOT pudding), any flavor
1/2 cup warm water
1-1/2 cups miniature marshmallows

Directions

  1. Whisk the gelatin mix and warm water together in medium microwaveable bowl. Microwave on high for about 1-1/2 minutes, then whisk again until the gelatin is completely dissolved into the water.
    2. Stir in the marshmallows. Microwave everything on high again for another minute, or until the  marshmallows are partially melted. Remove the bowl from the microwave and whisk again, this time until the marshmallows are completely melted and stirred into the gelatin mixture. Pour the gelatin mix into an 8-inch square pan sprayed with cooking spray.
    3. Refrigerate for about 45 minutes, or until set. Run a sharp knife around edges of pan to loosen the gelatin from the pan. Starting at 1 edge, roll up the layered gelatin tightly, like a jelly roll. Cut the roll into 1/2-inch slices. Refrigerate, covered, until ready to serve.

recipe adapted from Kraft

Teenage Mutant Ninja Turtle Birthday Party

The youngest son turned 6 a few weeks ago. And gone are the days of Mommy’s-pic, cute, cuddly party themes. We’ve finally graduated into picking our own, from last year’s Minecraft Party to this year’s choice of The TMNT.

Ninja Turtle Party 8Ninja Turtle Party 10

Cowabunga Dudes (and Dude-ettes) !

Let’s take a look at our totally radical Teenage Mutant Ninja Turtles Birthday Party theme.

First, the cornerstone of any good party: The Cake.

Ninja Turtle Party

We opted for an actual turtle to grace our cake, and the sons favorite it had to be. I thought our little Mikey (Michelangelo) turned out pretty well.

Ninja Turtle Party 3

I frosted it completely with green, left it in the freezer for a couple of hours, then used a toothpick to lightly draw the outlines of the face into the frosting. I recommend starting with the nose line. If you get that right, everything else is *ahem* a piece of cake. Then we piped in frosting of various colors to fill in the lines, and used a spatula to gently smooth them out. We finished it off by piping a line of orange rosettes around the bottom edge.

Ninja Turtle Party 4

The Turtles, Mikey especially, have a thing for pizza– so naturally we had to have some at the party. We picked up a few pizzas from Little Caesar’s for ‘eats’ and had pizza, and more pizza for dessert with these cute cookies. They’re sugar cookies I frosted red. The ‘cheese’ is finely grated white chocolate, with red M & M ‘pepperonis’. SOn # 2 works at a local pizzeria and snagged me a few pizza boxes for presentation, but I’m sure most local Mom & Pop joints wouldn’t mind giving you one or two upon request.

Ninja Party 5

We had Oreo cookie ‘Sewer Lids’ to munch on too. And in a nod to our anthropomorphic friends radio-active origins, we had some Toxic ‘Ooze’ to wash it all down with.

Ninja Turtle Party 6

We tend to keep the deocrations simple, using things we already have on hand. In this case? Nunchucks on the table (another nod to our beloved Mike) and talking turtle figurines. We used plastic bowls that happened to coordinate and red solo cups for untensil holders. I did splurge on coordinating plates and napkins ( each about $1 at Walmart) and a table cloth to keep clean up easy.

Ninja Turtle Party 7

Another thing we don’t do? Goody bags. You get cake and ice cream. Copious amounts of sugar are my gift/ thank you to you. On the other hand, we all know how much I love a good diy, or any kind of imaginitive play the keeps them away from outlets and batteries. When I saw an idea to make your own wearable turtle shells? Every kid was gonna get one! And they were adorable 🙂 I’ll have a how-to up next week so you can out fit your own Ninja Turtles in proper DIY-couture.

Ninja Turtle Party 9

And here’s my gorgeous sister so kindly modeling a shell for the birthday boy, and also using some of the photo props from a kit we found on clearance (again at Walmart) in the party planning section.

Simple. Straightforward. And the birthday boy and his friends thought it was all totally gnarly. Even the one boy who looked at my like I’d grown two heads when I asked him to eat over a plate as he was on his third bite of pizz-ookie, sprinkling my carpet with ‘cheese’.

Summer Sand Pudding

Are you a stickler for the grocery list? Or for grocery day for that matter. Because, I. AM

.Summer Sand Pudding

But every now and then, along comes a particular craft, or a recipe, or something, that looks so great… I don’t care that grocery day is still 3 more weeks away. I must has it. N O W. And off to the store I go.

Summer Sand Pudding 4

That is precisely what happened when I first saw Summer Sand Pudding. It looked soooo real. I couldn’t wait to show my guys. Even the presentation was kick-butt. In a sand pail, with a toy shovel for serving. Genius!

Summer Sand Pudding

This recipe makes a lot, and it’s rich so I’d suggest making this when you’re planning on a fun dessert for a crowd. It’s perfect for a back-yard barbecue or pretty much any pool party, ever.

Summer Sand Pudding

Summer Sand Pudding 3

1 pkg vanilla wafers
2-4 regular Oreos
8 oz cream cheese, softened
1/4 cup butter, softened
2/3 cup powdered sugar
2 small pkgs French Vanilla pudding mix
2, 3/4 cups milk
12 oz whipped topping

Directions

1. Use a food processor to pulverize the cookies into itty bitty crumbs. Use a mixer to cream together the cream cheese, butter, and powdered sugar. In another bowl, stir together the pudding mix and the milk until evenly combined and slightly thickened. Stir the pudding into the cream cheese mixture. Fold in the whipped topping. Layer into buckets with sand, pudding, sand etc, ending with a final layer of sand on top.

Gummy Bear Popsicles

Anybody who has little ones knows there’s something mesmerizing about any candy or treat that’s ‘gummy’. In this case, gummy bears. What little guy or gal, or big, or even the young at heart, wouldn’t love a special Popsicle made just for them with gummy bears hidden inside?

image

These sweet treats are ice cold with a sweet, sticky surprise inside. They’re perfect pool side or as post-meal treat on any hot day. Whip em out at your next bbq, and you’ll instantly rise in ranks to the ‘hostess with the mostest’. Even better? They’re healthier than baked goods and they’re ice. cold.

Gummy Bear Popsicles

Are you sitting there thinking, damn those look refreshing, and fun, but I can’t make those because I’ve already broken through (at last estimate) 284 cheap Popsicle molds, and refuse to invest in another ( because let’s face it, even at a dollar a pop from the $ store, it adds up )? Well if you are, then you probably haven’t heard of Zoku’s Popsicle molds.

Gummy Bear Popsicles 2

These little things are awesome. The green part is just a base, and everything is designed for easy removal. Designed for easy cleaning and use, this classic mold design features 6 removable molds and 6 sticks with drip guards. When your pops are ready, you simply lift the individual molds from the base by pulling on the pop stick and run the mold under under warm water for just a few seconds to release the Popsicle within. It’s fool-proof.

Gummy Bear Popsicles

Popsicle mold
Popsicle sticks
Gummy Bears
Sprite

Directions

1. Fill molds about 3/4 of the way full.
2. Drop in gummy bears.
3. Place popsicle stick into mold.
4. Freeze until frozen all the way through.

Homemade Fruit Rollups, with 3 Ingredients or LESS

Who doesn’t remember eating fruit by the foot as a kid?? They were a snack time favorite. Along with all the wacky, wonky little things you could do with them. You couldn’t tell us not to play with our food. Well, at least not our fruit by the foot. Fast forward twenty years, and now I’m in total Mom mode trying to foist heaping helpings of real fruit on my kids on the daily. But guess what? Now my kids want fruit roll ups for snack. I mean I get it, it’s a lot harder to ‘play’ with mom-approved fruit, other than the infamous banana- turned imaginary gun. Fruit roll ups are fun, sure, but they’re not everyday snack food. They’re just not. Or are they? Look out y’all, it’s a snack time stick up!! Hands up in the air and eyes open for this revolutionary idea. HOMEMADE fruit roll ups! Using as little as ONE ingredient. FRUIT! Fruit that You, Mom, will have a blast saying yes too. It only took me 20 years  to find my way onto this train. Better late than never, right? 🙂

I still can’t believe I never knew how easy these were to make! Now, I just can’t stop. The flavor combinations are endless. You can add in a bit of sugar for flavoring, a bit of lemon juice for color retention or keep it simple with just plain, old fruit.

 Homemade Fruit Roll Ups

We went with two of our favorite flavor combos for these, peach mango and an antioxidant mixed berry blend that included cherries, blueberries, strawberries, raspberries, and pomegranate arils. The hubs liked them so much, he’s even begun putting in requests. Specifically for apple. And the sons involved in sports? We’ve got banana roll ups waiting on them that are fun and full of potassium!

Homemade Fruit Roll Ups 3

Baking these is a teensy bit of a guessing game. They should be done dehydrating in 3-4 hours, but you’ll want to keep an eye on them regardless. They’re done when they no longer feel sticky, just a bit tacky. I had to feel it a few different times, at a few different stages, but by feel it’s pretty easy to judge. Also, watch out for over baking! Otherwise you’ll have a crispy fruit ‘chip’ on your hands.

Homemade Fruit Rollups, with 3 Ingredients or LESS

Homemade Fruit Roll Ups 2

 2 cups of fruit (fresh or frozen, but thawed if frozen)
1 tbsp freshly squeezed lemon juice
2-3 tbsp sugar or honey, optional

Directions

1. Place the prepared fruit (i.e. bananas, peeled and sliced, strawberries, washed and hulled, etc) in a blender or food processor and puree until the fruit mixture is smooth without an chunks remaining. Transfer the puree to a saucepan and stir in the lemon juice and sugar. Cook the fruit puree over medium to medium high heat for about 10 minutes, stirring frequently to prevent sticking or burning, until the mixture has thickened and the excess moisture cooked out. You’re looking for a jammy consistency.
2. Preheat the oven to 170 degrees, or as low as your oven will go, making sure it’s less than 200 degrees at the highest. Our oven goes from the ‘warm’ setting to 200, and we found setting it in between those two worked out perfectly.
3. Spread the puree/jam into a rectangle shape on a baking pan lined with a silpat or with a sheet of parchment paper. Use a spatula to gently help ‘spread’ the fruit puree as evenly as possible, until the rectangle-ish shape is about 1/8 inch thick. Also, as it cooks/dehydrates bear in mind that it will get even thinner, so just try to make sure that none of the jam is so thin that you can see through it as you spread. If using lighter fruits, like peach and mango ours was still see through in a few spots so we tried more to eye ball the thickness and tried to stick close to the 1/8″ mark.
4. Cook in the oven for 3-4 hours, until the fruit mixture no longer feels sticky, but just a bit tacky. Remove from the oven and let it cool completely. Gently remove the cooked, and now completely cooled, sheet of fruit by peeling it away from the silpat or paper and transfer it to a wax paper lined cutting board. Use a sharp, metal pizza cutter to cut it into long strips. Roll them up into the fruit roll ups, and enjoy!

recipe adapted from 15 Spatulas

Orange & Honey Vitamin C Supplement Gummies

 Shiver me timbers, matey. Have I got a tale ta tell ye. You like Pirates? o’ course you do. You’re a little guy and Pirates be cool. Possibly th’ coolest. They sail th’ seven seas in their big old pirate ships with their motley crew and be nigh on invincible. Or be they?

(glad I got that out of my system!)

I know it’s the 21st century and in the developed world you won’t see anyone sporting a nasty case of scurvy, but for Pirates (sorry with 4 boys I’ve learned a lot about pirates over the years) scurvy was a real plague upon their plundering. It was a serious scourge for anyone in the Maritime world pretty much up until the early 20th century when proper treatments were developed and fresh food and fruit was able to be safely stored for long periods of time. Food? Why food? Because food, especially your greens and citrus fruit contain Vitamin C, a must have for our bodies in collagen production. Remember all those times your Mom was haranguing you about eating your greens and pushing an extra serving of fruit on you? You should thank her, since it could be argued that she’s a life saver. Well, duh, she’s a Mom, but you catch my drift.

Flash forward 20 years and now it’s my turn to try anything (be it sneaking in, I’m not above forcing upon, or even the occasional bribe, I know how very pirate of me) to hoist those ‘good for yous’ onto, and into, my own guys’ growing bodies. They may not grow up to be bad ass Pirates in search of treasure, and I do hope there’s no pillaging or plundering in the cards for them, but you can’t beat staying healthy. And there’s no arguing that copious amounts of C are a definite plus.

So what do I do? I buy orange juice. You know, because I think that’s the most logical way to get this stuff into their little bodies in addition to their solid diet. And what do you know. I’ve got plenty of orange juice, orange juice that has an expiration date on it, and Son 4 refuses to drink the stuff. What’s a frugal mama to do? Well, I suppose I could have drank it all myself, and been sick. Or I could have forced it on the older sons and the hubs, but none of them were out of vitamins and I already force a supplement on them, so I’d feel kind of bad.

So I MADE some Vitamin C supplements for Son 4, ahoy! And he was gonna like em! Thankfully, he did. Otherwise there might have been a situation with a plank involved.

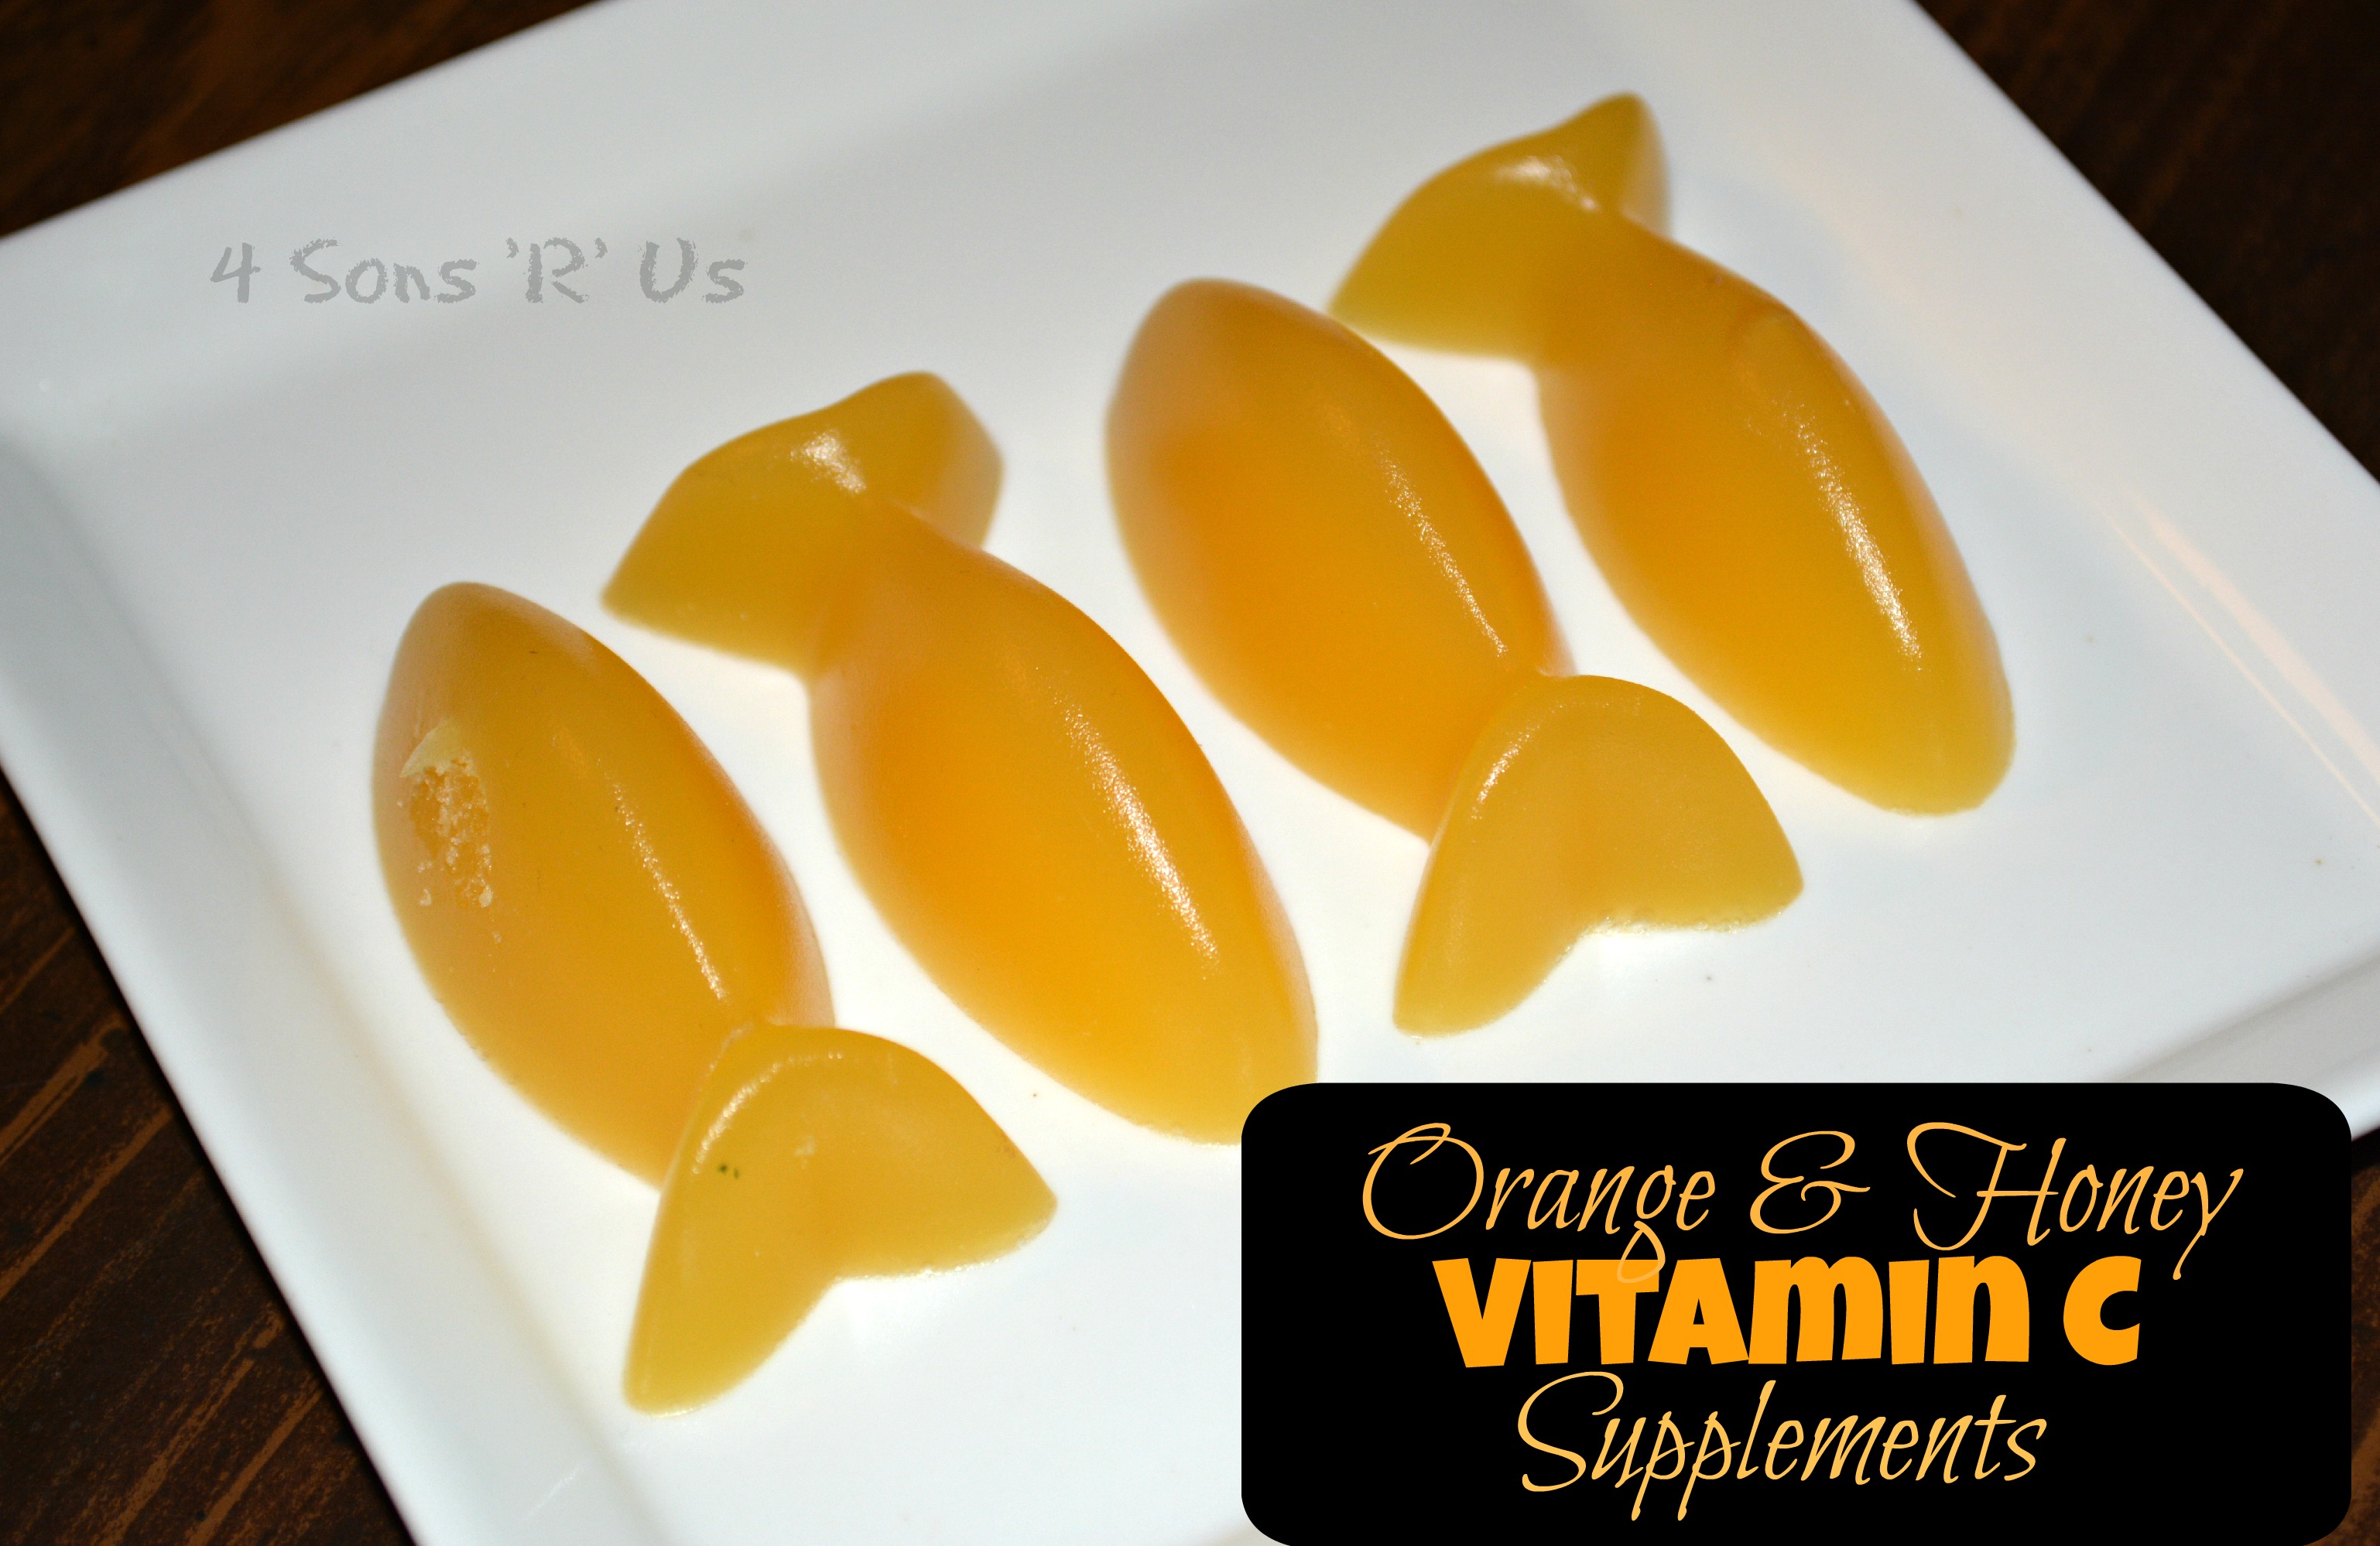
They’re pretty fun, especially if you have several different silicone molds to choose from. They’re also tasty, so for him it was closer to getting a fruit snack than taking a vitamin. Perception is everything guys. Wondering how we got them out of the molds so easily? With the silicon molds you just invert the shape and the set gummies pop right out. We’ve even used our molds to make crayons and side walk chalk and (of course) candy. So they’re really a fun and affordable investment.

Orange & Honey Vitamin C Supplement Gummies

orange & honey vitamin c supplement gummies

recipe adapted from Butter Believer

1 1/2 cups cold orange juice
7 tbsp gelatin powder
5 tbsp honey
4+ tsp of vitamin C powder
1/4 tsp orange extract (found in the baking aisle near the spices)
1/8 tsp vanilla
just a pinch of real sea salt

Directions

1. Add the orange juice to a small pot. Sprinkle the gelatin powder on top. Now, you’re going to let the gelatin “bloom”—this is key in getting good texture in your gummies and allowing the gelatin to fully dissolve. As the gelatin powder absorbs the liquid, it will cause the juice to swell up into a weird, wrinkled, brain-looking thing in your pot (kids always get a kick out of this). Let it do this for a couple minutes, and if the juice hasn’t totally absorbed the gelatin and you see white powder floating on top, stir it in. You can’t let any white powder on top stay there, or it will cause lumps of goo to remain (which are nearly impossible to dissolve) once you heat it up.
2. Now that all the powder has been absorbed, heat the mixture on low and let it liquify. As the juice gets warm and just a bit steamy, stir in the honey and the other remaining ingredients until everything is equally incorporated. Once the mixture is totally liquid (not thick and pudding-like), it’s ready to be poured into your molds.
3. You can use the different shaped silicon molds like we did, or you can simply pour the mixture into a small glass baking dish or baking pan, and then you can cut it into squares after it’s set or even let the kids use cookie cutters to cut out fun shapes.
4.  Place the filled molds or the baking dish in the fridge for about a half-hour, or until the gummies have completely set. The gummies should easily pop out when pushed from the bottom side.

3 Ingredient Edible Peeps Playdough

Another Easter’s almost here, and you know what that means. PEEPS! Peeps here, Peeps there, Peeps are everywhere. The hubs and the sons go nuts for these things. The hubs prefers to slit open a package and let them sit for a couple of days as he finds them quite pleasing when stale. (YUCK!) The sons will badger me incessantly if they see a package in the pantry, even though if they just patiently wait until Easter the bunny always loads their baskets up with several packages.

The past few years, I’ve seen mroe and more ideas floating around with different ideas and suggested uses for them. Last year we made Peep kabobs for their baskets. I noticed they’re now selling them in stores this year. Well this year we took it above and beyond by making this simple, but awesome edible ‘playdough’ for Son # 4. Even the older sons wanted in on this action. Although I was forbidden from photo documenting the event. No evidence and plausible deniability… blah, blah, blah. Who knows, maybe this will find it’s way to the Peep market eventually. In the meantime, it doesn’t get any easier and it’s tons of simple, sugary fun for you and the little ones to gear up for the holiday.

 peeps playdough

3 Peeps
1 tbsp of coconut oil
3 tbsp of powdered sugar, plus more for dusting

peeps playdough 3

Put both the peeps and the oil in a microwave safe bowl. Microwave for them for 10 seconds, just long enough to watch the peeps “grow” with the heat. Take the bowl out of the microwave and add in the powdered sugar and stir. As you stir the mixture in the bowl, the ‘dough’ should begin pulling away from the edges of the bowl. Lightly dust the lump with powdered sugar and work out any additional lumps in your dough with your hands.
If your dough is too sticky or too oily, add more powdered sugar, and alternatively if it is cracking, add a touch more oil. Use your hands to knead the dough until everything’s equally incorporated and it has reached a malleable consistency.

peeps playdough 2

Ok, so while we’re calling this playdough, it’s actually pretty much marshmallow fondant with some added pizzazz and Easter-y fun from the Peeps. The pink ball was with traditional peeps, but we went out on a limb and gave the party cake peeps a try, and it tasted even better! This edible marshmallow dough can be used and played with just like regular play dough, but it does not store well. So if you’re getting ready to make it, be sure to have the kiddos on hand to get the most play time in with it.

peeps playdough 4

Concerned this is too much sugar? Check out this version from Still Playing School that uses cornstarch instead of powdered sugar. Coincidentally, they also make a bigger batch so it’d be great for larger quantities for multiple little ones to enjoy.