Chewy White Chocolate Chip & Cranberry Cookies

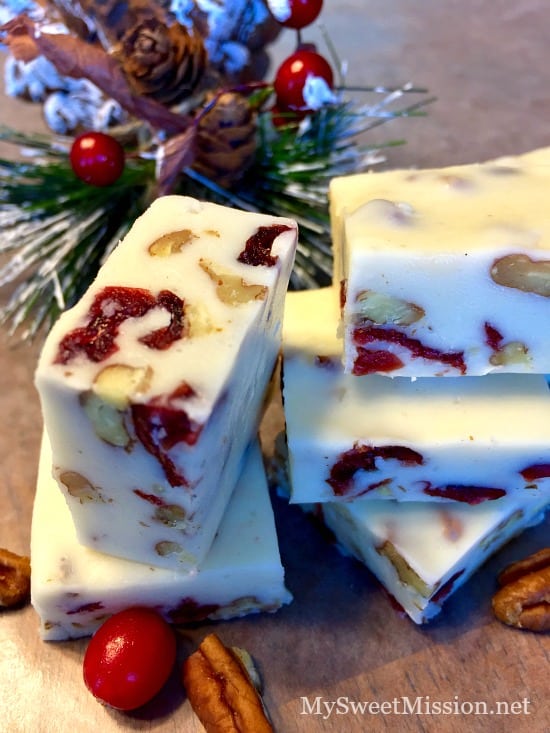
The chocolate chip cookie is truly an ‘All-American’ classic. It’s also pretty traditional anytime of year. I don’t know what it is, or why, but around the holidays my brain demands I change things up. And to said brain there are a few things that just *say* Christmas, one of them being a switch to white chocolate chips in my cookies.

 Chewy White Chocolate Chip Cranberry Cookies

And another thing? The add-ins change. Gone are the extra candies, even the oats got kicked to the curb. And although our favorite Christmas cookie add-in, Cranberries, are healthy, trust me when I say it’s not at all intentional.

Chewy White Chocolate Chip Cranberry Cookies 3

For real though, I love these cookies so much, I’d make them in Summer too if it was seasonally appropriate. (They’re so good, you can go ahead and insert a boo, hiss from my boys over that sad fact) So let’s recap, soft and chewy, yet crisp too, cookies that pair decadent white chocolate chips with sweet/tart dried cranberries. These are the perfect Christmas cookie combination, and any cookie aficionados dream.

Chewy White Chocolate Chip & Cranberry Cookies

Chewy White Chocolate Chip Cranberry Cookies 2

3/4 cup unsalted butter, softened
3/4 cup brown sugar, packed
1/4 cup sugar
1 large egg, at room temperature
2 tsp vanilla extract
2 cups all-purpose flour
2 tsp cornstarch
1 tsp baking soda
1/2 tsp salt
3/4 cup white chocolate chips
3/4 cup dried cranberries

Directions

  1.  In the bowl of a stand mixer, cream together the softened butter and sugars on medium-high speed until they’re whipped and creamy. Next, add in the egg and vanilla, and beat on high speed and mix until evenly incorporated.
    2. In a separate bowl, stir together the flour, cornstarch, baking soda and salt. Working a little at a time, mix the dry ingredients into the wet batter. (The batter should be pretty thick, and that’s ok) Use a spatula to gently fold in the white chocolate chips and the dried cranberries. Cover the dough tightly with plastic wrap, or transfer to a Tupperware and seal, and chill for at least 2 hours, or up to 2 days. Do not skip this step!
    3. Remove the dough from the refrigerator about 10 minutes prior to baking to allow it to come almost to room temp, if you let it chill overnight. It may take up to 30 minutes. While the dough softens, prep two baking sheets with parchment paper or silicone baking mats, and set aside.
    4. Scoop about 1 tablespoon of dough and roll, between your hands, into a ball. If the dough is crumbly, no worries, it will smooth right out when you roll it. Put the dough balls onto a non-stick baking sheet, about 1-1/2 – 2 inches apart from each other, to allow for spreading. Bake at 350 degrees for 8-10 minutes, or until just barely golden brown around the edges. They will look extremely soft when you remove them from the oven. Let the cookies rest for 5 minutes or so, until you transfer them to cooling rack to finish cooling completely.

Cheesy Sloppy Joe Hotdogs

Have you ever noticed how having kids, or caring for kids, or really just being exposed to kids on a regular basis forces you to revisit, and often rediscover, classic dishes from your own childhood? Especially when my guys were little, or going through their individual ‘picky palate’ stages, I’d have to get creative, and often the simplest answer was to call Mom and asked what the hell she had made that we would actually eat during those same trying times. And wouldn’t you know, almost every time the same things worked for me and my boys, like hot dogs and sloppy joes. But over the years we’ve all grown up (how much is often debatable 😉 ), and while we haven’t exactly outgrown these favorites, we’ve found them growing right along with us. Think of it as revisiting, and revitalizing the classics. And that’s how the Cheesy Sloppy Dog was born. And. It. Was. Glorious. And, of course, cheesy and messy enough in all its glory to be whole-heartedly embraced by both our emerging adult-selves and our inner child.

cheesy sloppy dogs

Nestle your favorite brand of hot dog into a warm toasty hot dog bun, top it with perfectly seasoned, just like Mama made ’em, ground beef-based sloppy joes and then spoon (or ladle) on a heaping helping of garlic cheese sauce. It’s cheesy, sloppy, ehrmagherd bliss in every bite. And, if you’re the parent now? You can even lick your fingers clean. Just don’t let the kids see. Do as I say, not as I do, right?

cheesy sloppy dogs 2

Ok, back to adult-ing. That’s a thing, right?

Head on over to my friend Alli’s blog, where we were guest posting today, to get the recipe.

Throwback Thursday # 18


It’s that time of week again, folks!!!

TBT

Welcome back to Throwback Thursday Link Party #18! Happy to see you all back. Can you believe that next week is Christmas? It has been creeping up fast on us this year! Have you all gotten your baking and shopping done? By the links you’ve all shared looks like you are well on your way! Guess what! We made it to 200 link ups, actually it was 201. We want to thank you for your continuous support of this party and sharing it so others can join.  Read the rest of this entry

White Chocolate Gingerbread Crescent Rolls

I can’t believe Christmas is only a week away. It never ceases to amaze me how fast a year goes by the older I get. And while I may have perfected my Masters in Procrastination over the years, gift buying is always an exception. I’m usually done with everything, except stocking stuffers, before the school year starts. And while I may *have* all the gifts hidden in sneaky little spots, that I can only hope I remember all of, it’s still the week before Christmas and I haven’t wrapped a single thing. Ya know what? It’s all going to work itself out, and every darn thing will get wrapped and placed perfectly under the tree, even if it’s not until 3am Christmas morning.

 White Chocolate Gingerbread Crescent Rolls

One thing I do enjoy wrapping up? Surprises, in the middle of snacks for the kids. And whether I’m serving them for brunch, for snack, or even dessert, there’s nothing quite as perfect for this as the crescent roll. Just picture it: the flaky outer pastry of a perfectly cooked crescent roll, with crumbled spicy ginger snaps, a dash of Christmas colored sprinkles, and a white chocolate drizzle are a perfect outer shell, hiding the perfect complimentary flavors inside, rich cream cheese and sweet white chocolate.

White Chocolate Gingerbread Crescent Rolls 3

Think of it as a present for your mouth, one that’s just waiting to tickle those tastebuds.

White Chocolate Gingerbread Crescent Rolls

White Chocolate Gingerbread Crescent Rolls 2

1 8 oz, 8 count, tube of crescent roll dough
4 oz cream cheese, softened and cut into 8 equal cubes
3/4 cup white chocolate chips
8 gingersnap cookies, crushed
red, green, and/or white candy sprinkles

Directions

1. Roll out the crescent dough onto a lightly greased baking sheet.
2. Fill each crescent roll with 1 cube of the cream cheese, 1 tbsp of the white chocolate chips, and a pinch of the crushed gingersnaps.

3. Start at the fat end and gently roll up the triangle to form crescent shape, repeating for the remaining crescents.

4. Bake the prepared rolls at 350 degrees for 15-18 minutes or until golden brown.
5. In a double boiler, or in the microwave, melt the rest of the white chocolate chips. Drizzle the chocolate over the crescent rolls and then sprinkle the rest of the crushed ginger snaps over top. Finish off with a handful of candy sprinkles. Serve warm.

recipe adapted from Lemon Tree Dwelling

Like what you see? There’s more …

4 Sons 'R' Us: Nutella Crescents

Nutella Crescents

4 Sons 'R' Us: Snickerdoodle Crescents

Snickerdoodle Crescent Rolls

4 Sons 'R' Us: Sugar Crumb Crisps

Sugar Crumb Crispies

Pepperoni & Basil Tortellini Salad

Usually, I’d argue that this dish makes a perfect salad for Summer, whether it’s as a side dish or a meal itself. And it does. But when it’s unseasonably warm weather-wise on the home front and were less than two weeks away from Christmas, I’m not going to rant or rave. I mean I can’t actually do anything about it, so why not just go with it?

Tortellini & Pepperoni Pasta Salad 2

Just picture it, your favorite cheese tortellini with ripe grape tomatoes ready to burst with flavor, fresh basil, a generous helping of chopped pepperoni, and all mixed up with your favorite creamy Caesar salad dressing. It’s definitely not for the faint of heart, or anybody on a diet, but if neither of those apply to you, it’s a dreamy combination.

Tortellini & Pepperoni Pasta Salad

Trust me you want in on this dish. In a month filled with warm, rich comfort foods and chaos and (if you’re a parent) kids home on break needing more lunch options than the typical brown bag variety, run headlong toward this ‘salad’. This is pasta salad, 2.0, and it’s just the change of pace we enjoy. With the roller coaster weather, us and our meals have to roll with the punches.

Pepperoni & Basil Tortellini Salad

Tortellini & Pepperoni Pasta Salad 3

1 (20 oz) pkg cheese tortellini, or about 3-4 cups frozen tortellini
1 cup pepperoni slices, chopped
1/3 cup finely chopped fresh basil
1/2 cup cubed, or shredded, mozzarella cheese
1 cup caesar dressing
1 cup grape tomatoes, halved

Directions

  1. Cooked the tortellini according to package directions. Drain and transfer the tortellini to a large bowl.
    2. Stir together the dressing and the cooked tortellini. Add in the pepperoni, basil, cheese, and tomatoes and gently stir together, so that the tortellini don’t fall apart, until everything’s evenly combined.
    3. Cover and refrigerate for at least 2 hours before serving.

Throwback Thursday # 17

It’s that time of the week again, and I’m looking forward to seeing what everyone’s got for us this week!

TBT

Hello our lovely partiers! We are happy to have you back for our Throwback Thursday Link Party #17! Again another great turn out at last weeks party, still didn’t hit our 200 link up mark but that’s ok! We will get there, we are just happy that you all choose to come back and party with us each week!

We had some great links last week like always. Love seeing all the Christmas ideas rolling in, put’s us all in the holiday spirit. Also, gives us some great ideas of our own for decorating and baking this time of the season. Now without wasting anymore time here are our lovely features!

MOST CLICKS:

White-Chocolate-Cranberry-Pecan-Candy-1

White Chocolate Cranberry Pecan Candy from My Sweet Mission

SOME OF OUR FAVES:

CRANBERRY-Upside-Down-Cake

Cranberry Upside Down Cake from Serendipity & Spice

Peppermint-Marshmallows-Recipe-4

Homemade Peppermint Marshmallows from Home Cooking Memories

Ham-Cheese-Tater-Tot-Poutine-Titled

Ham and Cheese Tater Tot Poutine from Frugal Foodie Mama

Maple-Bacon-Fudge-700x1046

Maple Bacon Fudge from Krystal’s Kitsch

DIY Christmas

Goodwill Blogging: DIY Christmas Gift Decor from Sadie Seasongoods

Woohoo congrats everyone! You guy’s are really bringing it! How about we party shall we?! But first let us get down to the nitty gritty:

Party Guidelines:

Link up anything that is created by you! Please no link ups, stores or giveaways.

Link up as many posts as you’d like.

Please follow us on at least one of our social media platforms:

Alli @ Tornadough Alli
Blog – FacebookPinterestTwitter  Google + – Instagram

Quinn @ Dad Whats 4 Dinner
BlogFacebookPinterestTwitter – Google + – Instagram

Meaghan @ 4 Sons ‘R’ Us
Blog – Facebook  Pinterest – Twitter – Instagram

Mollie @ The Frugal Hausfrau
Blog – Facebook – Pinterest – Twitter

Please share only the links to your post and not your blog.

This is a party and mingling is highly recommended, please try to click on one or more links! This raises your chances of being featured!

Not required but very much appreciated, link back to my site by either your post or grab my button and put it on your link parties page.

We would also greatly appreciate any sharing of this party on any social media platforms! If you tweet it they will come. Sharing is caring people. We will be sharing your links throughout the week on our personal pages as well! Which brings me to my next point: All photos submitted to the Throwback Thursday Link Party, grant the rights to display their photo on our websites and any social media sites used in promotion of your link. We are not responsible for stolen images or the mis-use by others who have found your image through this link party.

Click the button below to enter the party with us 🙂

Candied Caramel Apple Cream Cheese Spread

The holidays can be such a chaotic time with all the activities, shoot sometimes I get sensory overload from all the bright lights alone. And planning, hosting, and delivering on family parties and potluck a is often no exception, so when I came across a recipe that simply doused a block of plain old cream cheese in caramel sauce, I knew it was perfect. (And not just because I can never get enough cream cheese; you know my feelings about cheesecake and dips.). ​When in doubt keep it simple. This is going to be my new go-to party spread.

 Candied Caramel Apple Cream Cheese Spread

According to Buddy, the elf, ‘the best way to spread Christmas cheer, is singing loud for all to hear.’ And while we whole-heartedly agree, tasty treats are always a close second for spreading warmth and comfort to family and friends anytime of the year.

Serve this cream cheese spread and watch everyone cheer. We’ve topped it with Heath candy bits, but you could opt for plain toffee bits, or even nuts like pecans or walnuts for a less sweet, more rustic feel. Either way, it invites guests to dig right in.

Candied Caramel Apple Cream Cheese Spread

Candied Caramel Apple Cream Cheese Spread 2
8 oz cream cheese
caramel sauce (homemade or store-bought)
crushed Heath bar candy, toffee bits, or nuts such as pecans or walnuts for topping
sliced apples, pears, pretzels, or graham crackers for serving

Directions

  1. Place the cream cheese on a serving dish. Pour as much caramel sauce as you want evenly over top of the cream cheese. Sprinkle with a generous helping of your topping of choice.
    2. Serve with sliced apples, pears, pretzels and/or graham crackers.

recipe adapted from She Wears Many Hats

Pomegranate, Feta, and Chive Pinwheels

Everywhere we go everything is decorated. And while there may be a whole spectrum of ‘holiday’ colors, red and green are by far the stars of this show. One thing I don’t see a lot of? Festive dishes.

Hold on, let me stop you right there. I’m not talking about the traditional holiday favorites. Or even all the cute ones made to look like Holiday favorites, like our Christmas Tree Pull-Apart Bread or our Christmas Tree Pancakes. Those are a given. I’m talking about ‘decorated’ festive dishes made specifically with Christmas colors in mind. My Mom used to say that at least half of her enjoyment in a dish wasn’t just taste or even presentation, but about the colors and whether or not they spoke to her. She loves a vibrant presentation, and I can honestly say that I’ve come to appreciate one as well.

Pomegranate & Feta Pinwheels 2

Red pomegranate arils and bright green chives stud a bed of snowy white feta and whipped cream cheese, and it’s all wrapped up into perfect pinwheels. Talk about the total package! Visually engaging with a mouth-watering flavor combination, these just beg to be included in your Christmas buffet or at any holiday party.

Pomegranate, Feta, and Chive Pinwheels

Pomegranate & Feta Pinwheels

8 oz whipped cream cheese
5 oz crumbled feta cheese
¼ cup chives, chopped
⅓ cup pomegranate arils, rinsed and gently patted dry
4 fajita size tortillas

Directions

  1. In a medium size bowl, stir together the cream cheese, feta, chives and pomegrante arils.
    2. Spread the cream cheese out evenly over all four tortillas.
    3. Roll each tortilla tightly (like you would a Swiss or jell roll) and wrap the roll in plastic wrap. Refrigerate the filled tortillas for at least one hour, or overnight if making ahead of time.
    4. Use a serrated knife to slice each tortilla into 12 pinwheels before serving.

recipe adapted from Melanie Makes

Eggnog Monkey Bread

Monkey Bread is one of the sons’ favorite things to eat, and it’s little wonder why. It’s sticky, it’s sweet, and it’s basically dessert that they have permission to eat for breakfast and they get to wash it all down with a tall glass of cold milk.

Think you don’t have time to make such a yummy dish from scratch? We’ve made this super simple to make, so simple you’d have to try hard to actually mess it up.

Eggnog Monkey Bread 2

Even better? This isn’t any ordinary monkey bread recipe, this one is dressed specifically for the holidays, with its typically sugary sweet, pull apart pastry and a liberal buttered eggnog cream poured overtop.

Eggnog Monkey Bread

Eggnog Monkey Bread

1 can (16.3 oz) regular refrigerated biscuits, no flaky layers or butter flavored

3/4 cup sugar

1/2 tsp nutmeg

6 tbsp butter, melted

Directions

1. Mix 1/4 cup of the sugar and the nutmeg, stirring to combine.

2. Separate the biscuits and use a pair of kitchen shears to cut each one into 4-6 pieces and put the cut pieces in a large zip locking bag, or a large tupperware.

3. Add the sugar mixture to biscuits, seal, and shake well to evenly coat the biscuit pieces.

4. Transfer the sugared biscuits to a greased 6 cup bundt pan.

5. Mix melted butter and the remaining 1/2 cup of sugar and pour it all over the biscuits in pan.

6. Bake at 350 degrees for 28 minutes, or until golden brown.

7. Let the bread cool in the pan for 10 minutes before removing. To remove, tip the bundt pan upside down onto a serving plate, give it a pat or two if needed to release the bread, and top it with the eggnog glaze.

Eggnog Drizzle

1 cup powdered sugar

1 tbsp butter, softened

1/2 tsp rum extract

3 tbsp eggnog

1/8 tsp nutmeg

Directions

1. Stir together all the ingredients until evenly combined, add more eggnog if you’d prefer a thinner consistency. Drizzle the eggnog glaze over the monkey bread.

Crusty, Fool-Proof Baguettes In 30 Minutes Flat

Quick & crusty baguettes in 30 minutes flat. Say that five times fast. How many of you thought you’d ever be able to say that at all, let alone believe it? This recipe is like the best (not anymore!) kept secret on the planet. It’s so easy, it’s been called fool proof. It’s perfect for beginner bakers and as an easy introduction to from-scratch bread making. Plus, it only uses five (yes, 5) everyday ingredients you probably already have in stock.

Baguettes for Beginners 2

Soft and flaky on the inside, crisp and crusty on the outside. They’re perfect for tearing into and chewing alongside your favorite pasta, your favorite cheese, your favorite soup, or for something as simple as slapping on a slab of your favorite butter. These baguettes are perfect. And they can be made last minute. Goodbye pre-planning and hours of rise time. I won’t miss tip-toeing around the house or trying to time nap time so heavy foot steps and little running feet wouldn’t make my dough fall, that’s for sure!

Baguettes for Beginners 3

This recipe makes two loaves, and we love to enjoy one fresh out of the oven with our favorite spices in a little olive oil for a quick and easy appetizer to tide us over while our main meal cooks.

Crusty, Fool Proof Baguettes In Under 30 Minutes Flat

Baguettes for Beginners

2 cups very warm water
1 packet yeast, or 2 1/4 tsp dry active yeast
2 tbsp sugar
1 1/2 tsp salt
3-4 cups of flour

Directions

 1. Preheat the oven to 425 degrees. In a large bowl, whisk together the warm water, yeast, and sugar. Set the bowl on top of your preheating oven for ten minutes. Stir in the salt and add the flour a half-cup at a time, until the dough becomes soft, but not sticky. Knead the dough until elastic.

2. Cut the dough into four even pieces. Roll each of them into four long, thin ropes. Twist together two of the ropes to form one loaf. Twist the other two ropes together to form a second loaf. Transfer both onto a large baking sheet lined with parchment paper.

3. You can now bake the loaf right away (if you’re in a hurry), or allow it to rise for an additional 15-30 minutes on top of your warm oven.

4. Fill a large bowl with 3-4 cups of ice. Open your hot oven and place the baking sheet with the baguettes inside, then toss the ice cubes on the bottom of the oven and quickly shut the door. Do NOT open your oven for 15 minutes (the steam for the ice is what creates the crunchy outer crust). Bake until golden brown, about 15-18 minutes.

5. Serve warm with butter or with a dipping sauce of your favorite seasoned olive oil.